Create an Event
Watch the video above for a helpful, quick tour of the event creation/editing process!
To create or edit an event, log in to your account by clicking Login at the upper right corner of the Events Calendar site. Once logged in, select Administration from the dropdown menu to the right of your avatar. Select Events, then Add Event from the site navigation to create a new event. To edit an existing event, select Events, then Pending or Live to see a list of events you can access. Select your event from the list, and you will be presented with the event editing form.
Basic Information
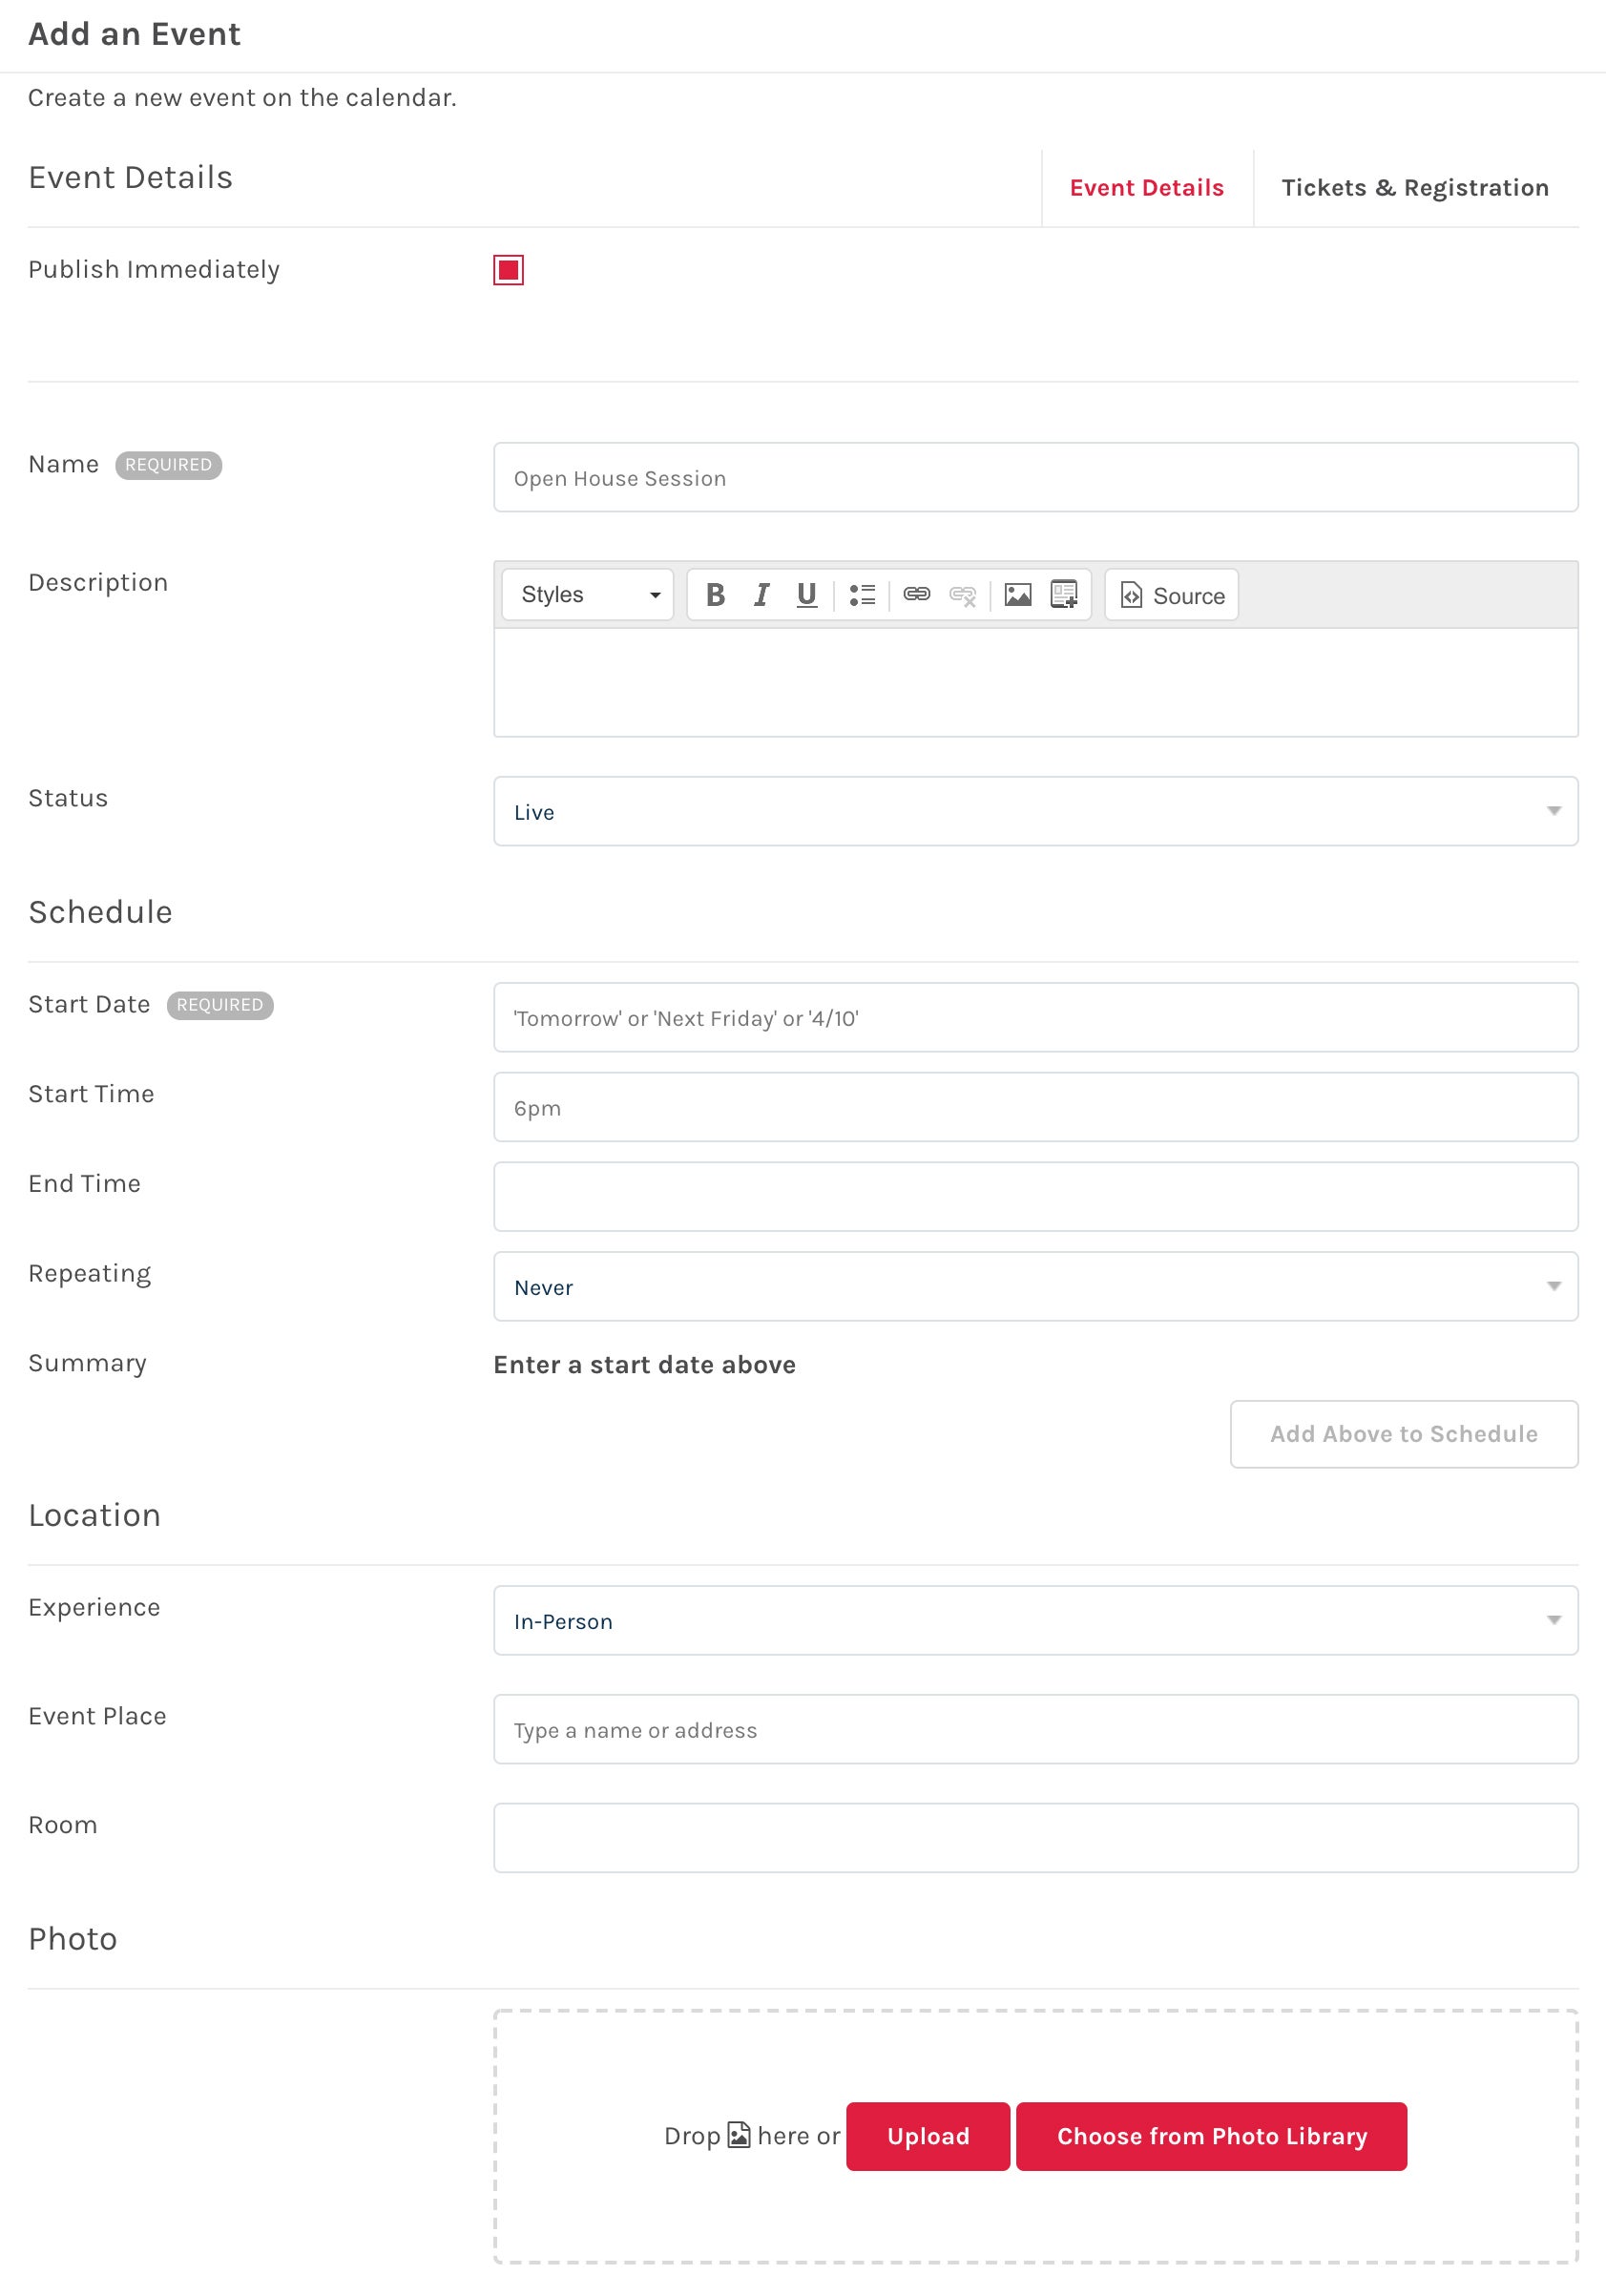
While the form used to create an event in our new system looks different, the process is quite similar.
The Name and Description fields are required and should contain all of the essential information describing the event.
New to the system is a menu to select an Event Status, including Live, Canceled, Postponed, and Sold Out.
Schedule
Scheduling your event is very flexible. For recurring events, you can choose from a variety of repeating patterns such as “Every Mon, Wed, Fri,” and “the Nth day” (where N corresponds to the day of the month you entered). You can also vary the time for your events, setting up patterns like “Every Mon, Wed, Fri 2 pm – 6 pm and Every Tue, Thur 4 pm – 6 pm.”
Important note on time zones: the default time zone for our calendar system is Pacific. All events, regardless of their time zone, should be entered with this in mind and adjusted accordingly. For example, if your event is in New York from 8 am to noon, you would enter the time as 5 am to 9 am.
Location
The Location section of the event creation form changes fields depending on the type of experience you’re offering: In-Person, Virtual, or Hybrid.
In-person Events
For In-Person events, you’ll enter the Event Place. Many locations on campus are already entered into the system. Each of these places has a landing page with information about the venue, a photograph, a map for your attendees, and, in some cases, parking information. Begin typing the name of your venue in the field and it will automatically find locations that match your typing. This search can be a little bit slow, so if you don’t see your desired selection immediately – give it a few seconds to catch up.
When an In-Person event is live, its page will display the following elements in the left info sidebar:
- The location name (and room, if provided), which links to the location’s Place page on the Events Calendar site.
- The location address.
- A “View map” link links to a Location section that displays an embedded Google Map below the Event Details section on the right.
Check out this example In-Person event to see how the information displays.
Virtual Events
Virtual events allow you to create a Zoom meeting right from the form (you’ll have to grant the event system access to your Zoom account the first time you use this feature). Clicking the Create Zoom Meeting link will automatically create a unique meeting for your event as well as populate the Dial-In Instructions and Stream URL fields with those details automatically. If you’d rather set up your Zoom meeting outside of the Events Calendar, or if you use a different service, you can always copy and paste that information into the appropriate fields.
If you’re offering a live stream of your event, paste your URL in the Stream URL field. If your streaming service offers an embed code for others to use on their sites, paste that code into the Stream Embed Code field to embed the livestream right on your event’s page.
When a Virtual event is live, its page will display the following elements in the left info sidebar:
- A “Virtual Event” link, which links to the URL entered in the Stream URL field.
- A “View stream information” linking to a Stream Information section that displays below the Event Details section on the right.
- The Stream Information section will display a “Join Stream” button that links to the URL entered in the Stream URL field, followed by the information entered in the Dial-In Instructions field. If you’ve entered embed code in the Stream Embed Code field, the embedded stream will display in place of the “Join Stream” button.
Check out this example Virtual event to see how the information displays.
Hybrid Events
Hybrid should be used for events where both In-Person and Virtual attendance is offered. When creating a Hybrid event, all of the fields and options are given to creators of In-Person and Virtual events are available – both described in detail above.
When a Hybrid event is live, its page will display an “In-person and online” heading in the left info sidebar, followed by the In-Person and Virtual event elements described above. Below the Event Details section on the right, both the embedded Google Map and the Streaming Information sections will display.
Check out this example Hybrid event to see how the information displays.
Photo
Every event created in this system will have a photo attached. These photos appear on event detail pages, event listing pages, and other places, such as email digests sent to Event Seekers. We’ve added a few dozen photos to the Photo Library for your use; however, we encourage all Event Publishers to provide their own unique images to help them stand out and create unified messaging across your various channels.
Image dimensions
Images are displayed as a square (1:1 aspect ratio) and a rectangle (16:9) in various places on the website. If your event image is simply illustrative and the cropping of it isn’t a concern, upload your photo, and you’re ready to go.
However, if the active area of your image is critical – e.g., there is text that must be readable or the focal point displayed is important – simply uploading a square image will not display properly at first. The approaches below will help ensure that your image will display as desired.
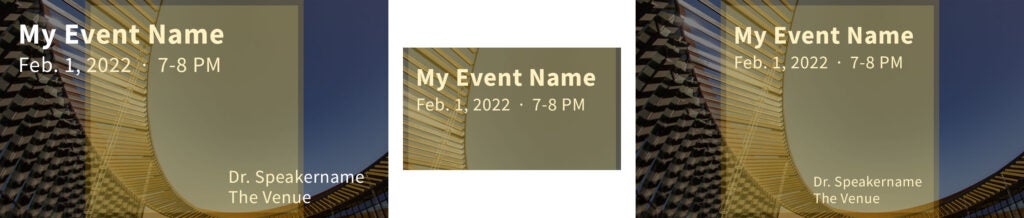
The second image shows what happens when a square image is uploaded, then cropped to 16:9.
For best results, keep your important information inside a square while providing enough image to fill out a 16:9 rectangle, as seen in the third image.
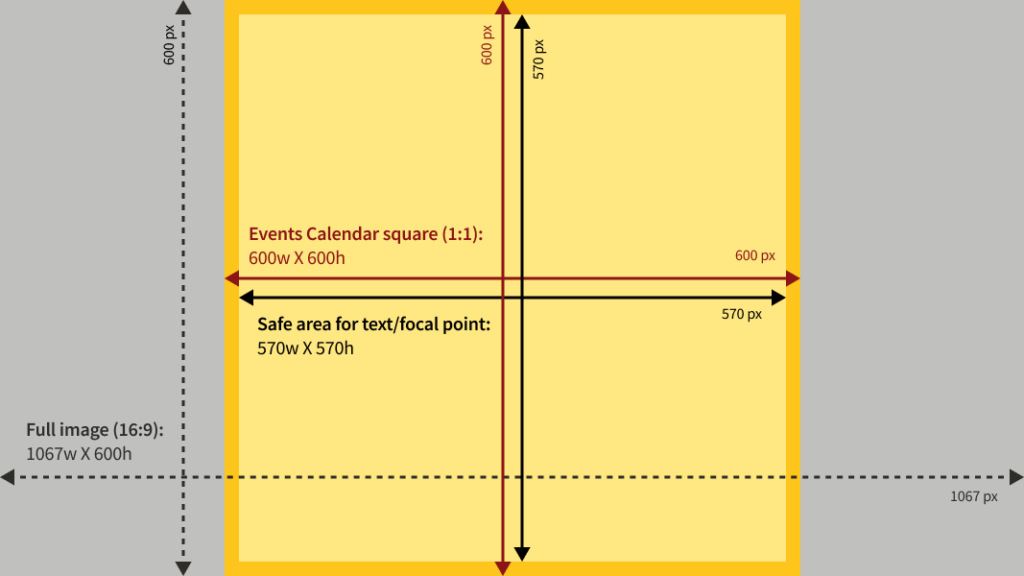
Preferred: Use our template
The template, available for download below, is 1067 pixels wide by 600 pixels tall, with a 16:9 aspect ratio. Included in the file are guides to indicate safe areas where the critical content should be placed for accurate display in the site’s square format. If you use this template and follow its guides, you should be able to upload your image without making any further adjustments in the system.
Copy Figma template
Download Photoshop (.psd) file
Use any image and adjust the crop and positioning in Localist
If you create and upload a square image to start, you will need to adjust the image crop for accurate display on the site. To do this, follow the steps below.
- Save your event with the square image uploaded.
- Scroll back down to the Photo field and click the pencil icon next to the image – this will open a new tab where you can edit the image details.
- Click the Adjust Cropping tab at the top right of the page.
- On this page, you can adjust the cropping of your image for all sizes generated by the system – the square is the last one on the page.
- Once you’ve made your adjustments click the Save Changes button at the bottom right of the page.
Including an image in the event description
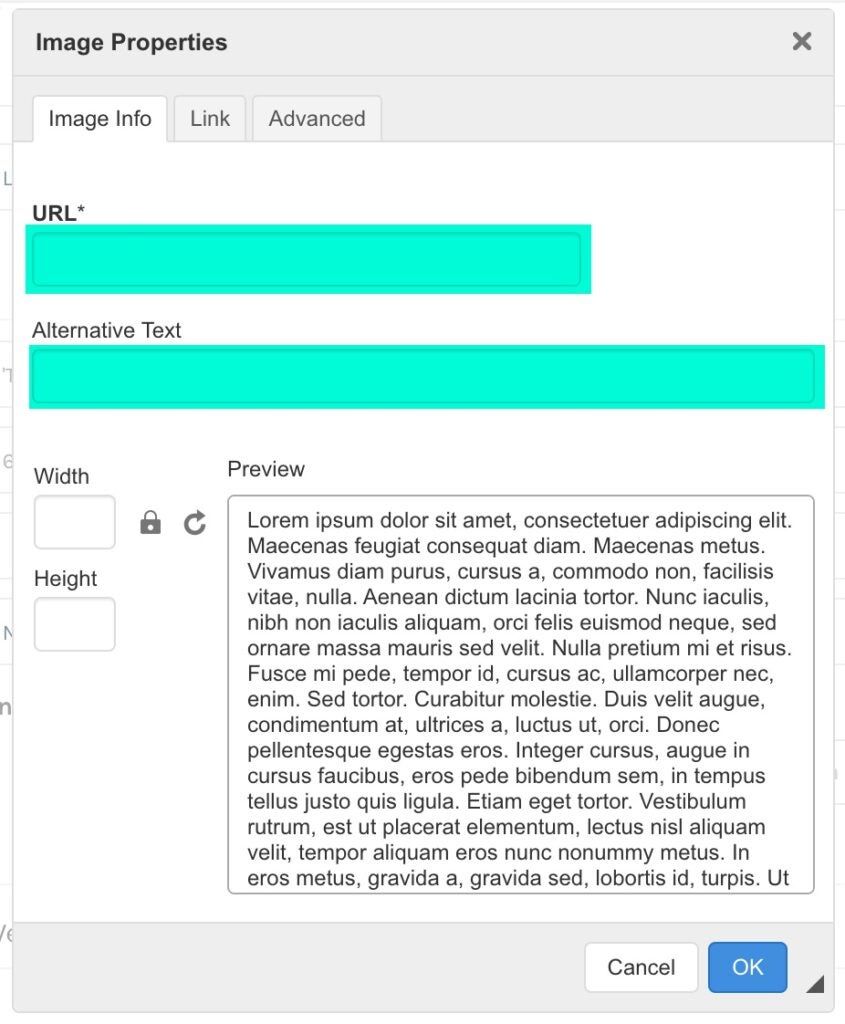
If you’d like to include additional images for your event, you can add them to the event’s description field. Localist does not support uploading images directly; you’ll have to host them elsewhere. If you have access to a departmental or another website where you can host them, do so; you’ll copy the URL for that file and use the image insert button as seen here:

You can also use a free service like postimage to host your images instead. Make sure you choose a reasonable resize option, like 640×480 or 800×600, as seen here:
Classifications
The Classifications section features five dropdown menus, all with predefined selections. If appropriate for your event, you can make multiple selections from each menu.
If your event has multiple sponsors, you can find each of them in the Groups and Departments fields; start typing and the system will help you find them. To add multiple Departments or Groups, you must have them added to your account access.
See our comprehensive Best Practices for Classifications guide for additional guidance on using Classifications.


Additional Event Information
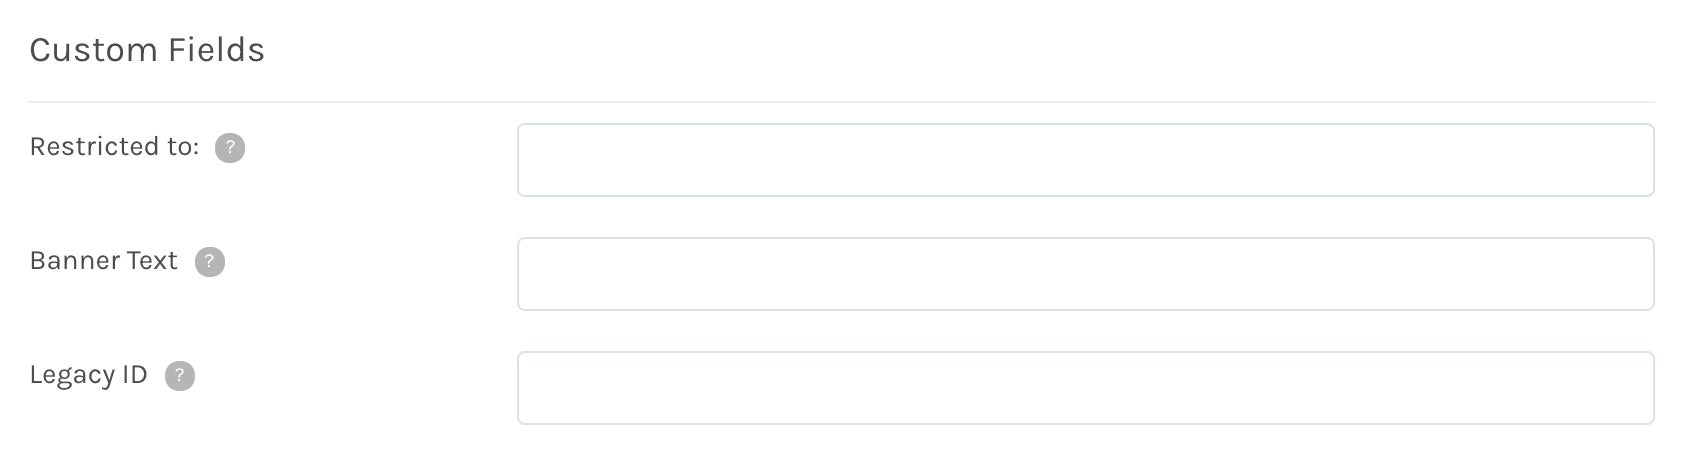
In the Custom Fields section, you will find three fields we’ve created for special use. If your event is meant for a specific audience only, use the Restricted to field for that information, e.g., Restricted to first-year chem students. This will be displayed on your event as white text on a red background. The words “Restricted to:” are part of the template and don’t have to be entered by you.
The Banner Text field is intended for the information you want to be certain is seen. For example, if you have an outdoor event, you may want to enter Seating is not provided; please bring your own chairs and blankets. This will appear on your event as a white banner with red text.
Note: Legacy ID is necessary during the transition period from our legacy system to Localist; please do not enter anything into this field. Origin ID is for a subset of users syncing to external calendaring systems.
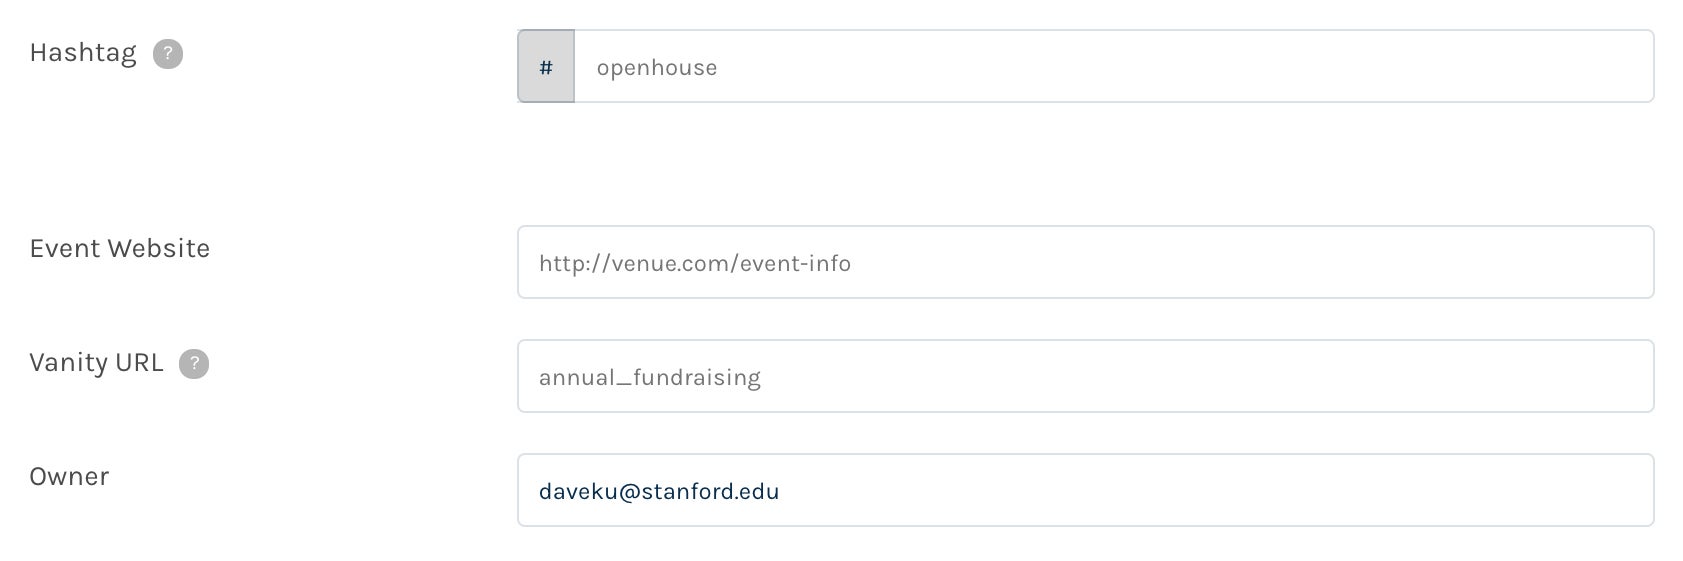
You can use the Hashtag field to share the keyword you would like people to use when sharing posts and pictures of your event to their social media accounts. The hashtag entered in this field will display on the event’s detail page and link to a Twitter search page, like this one aggregating all Tweets with that hashtag.
If you have an event-specific website or webpage you’d like to promote, enter it into the Event Website field.
Our calendar system automatically generates a URL based on the title you entered for your event. If you’d like to change that URL, you can do so in the Vanity URL field. Note that there can only be one event with a specific URL; the system will alert you if you’ve entered one already in use.
Event Insights and User Engagement
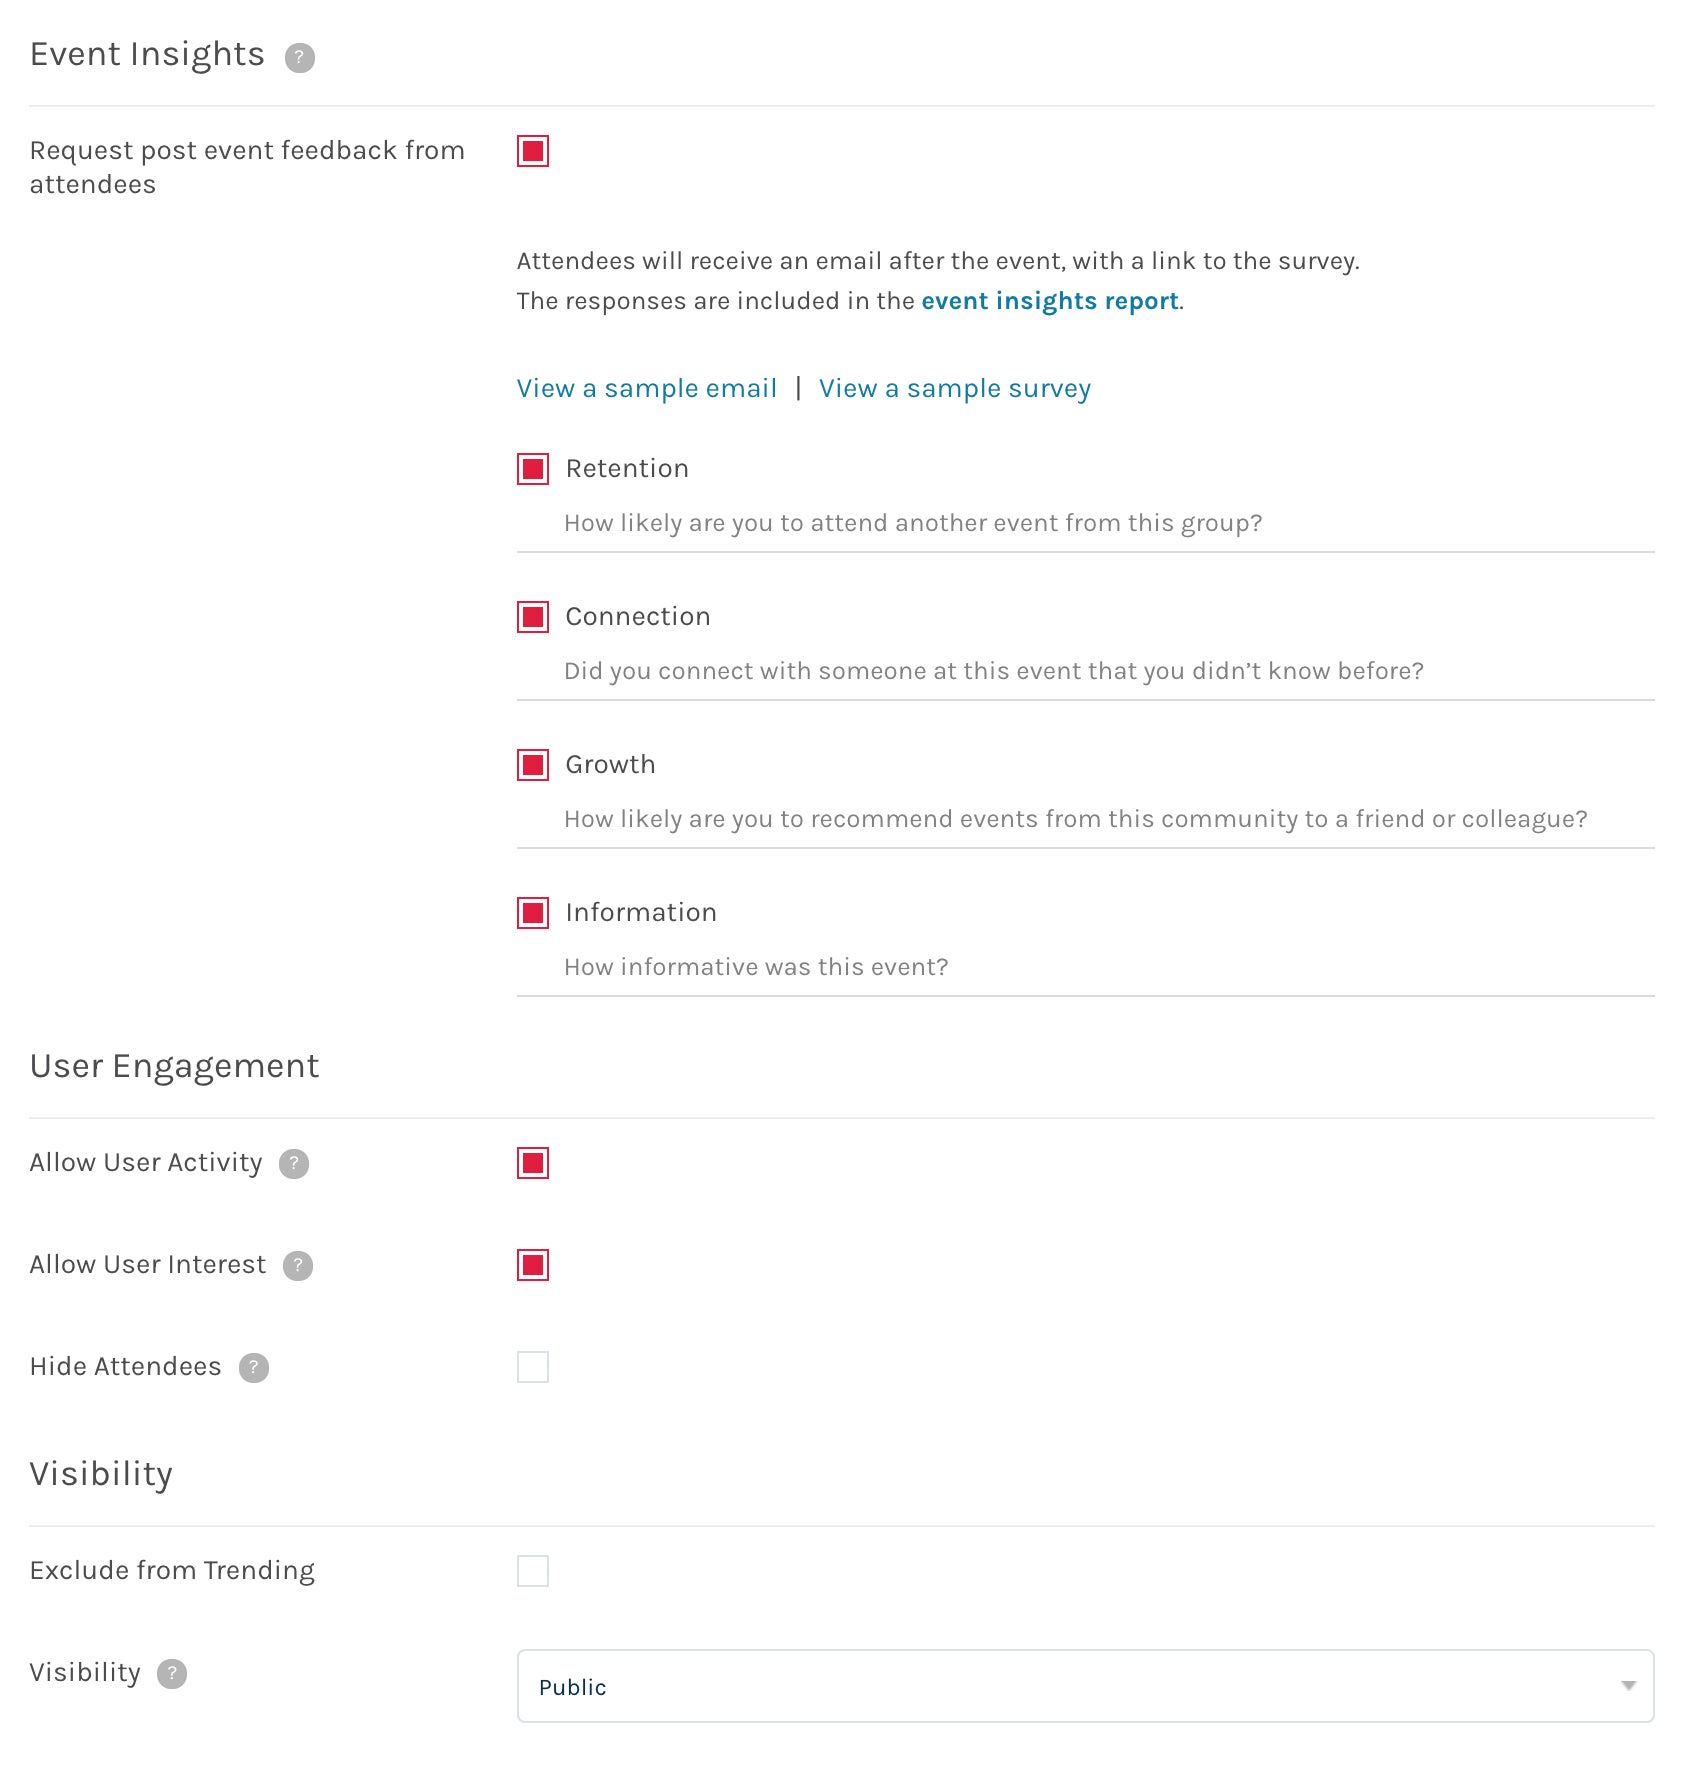
Use the Event Insights feature to gauge audience reaction and engagement after your event has concluded. Event Seekers who have used the Save feature while browsing events will receive an email requesting a star rating within two hours of the event end time. When the user chooses their star rating, they’ll be taken to the Events site, where they can answer a few simple questions and offer feedback.
As the Event Publisher, it’s your choice whether to request feedback. If you opt-in to this feature, you can select which of the four pre-defined questions you would like to ask. Click Preview the email and Preview the survey for a look at what your attendees will see.
Under the User Engagement section, note that the Allow User Activity checkbox status has no effect. We will not be sharing user comments and photos about your events.
With Allow User Interest checked, Event Seekers can use the Save feature to add your event to their interest list.
Your event listing will display the number of Event Seekers who’ve used the Save feature, shown as “N people are interested in this event” below the event description. Unchecking the Hide Attendees checkbox will remove this text from your event display.
You can manage the visibility of your event in three ways. By checking the Exclude from Trending box, your event will be ignored by the algorithm used to determine the events that are shown on the site’s homepage.
Unlisted events are not shown on any listing pages. You’ll have to send your event URL to your exclusive audience to share the event information with them.
Selecting Restricted will give you a set of options for where your event will be displayed. See Restricted and Private Events below for more information.
Finally, if you’d like to have the Events Calendar Team boost the visibility of your event, submit a ticket via our contact form.
Restricted and Private Events
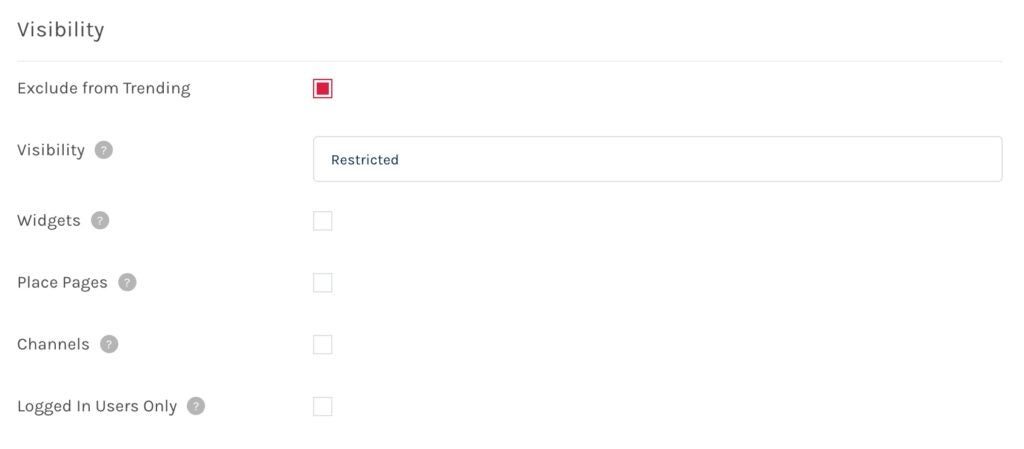
You can limit the visibility of your events by making selections in the Visibility section. Here’s how the different Restricted options work:
- Restricted > Widgets: Events will only be visible in Widgets and not shown on any other calendar pages.
- Restricted > Place Pages: Events will only be visible on Place Pages and not shown on any other pages on the calendar.
- Restricted > Channels: Events will only be visible in Channels and not shown on any other pages on the calendar. Note that at this time, Stanford is not using the Channels feature.
- Restricted > Logged In Users Only: Events will only be visible to logged-in users and not shown in Widgets.
For more information about hosting private events, see 4 Ways to Host Private Events and Visibility on the Localist support site.
Free & Paid Events
Clicking the “Tickets & Registration” tab at the top of the event creation form reveals the following fields:
- Use Localist Register (Stanford is not utilizing this part of the platform so keep this unchecked)
- Ticket cost
- Registration URL
- Eventbrite ID (Did you know you can get access to Eventbrite here?)
If these fields are left blank, no changes to the event detail page will be displayed.
Free events
To indicate an event is Free and provide a place for users to register, first enter one of the following values in the “Ticket Cost” field:
- Free
- A phrase with the word “free” included – i.e., Free event, Free tickets, Free – RSVP, etc.
- $0 or 0
- $0.00 or 0.00
- Leave field blank
Now, enter a URL for registration in the “Registration URL” field.
Following these steps will result in the value entered in the “Ticket Cost” field being displayed on the event’s detail page, and the word “Register” hyperlinked to the URL you entered in the “Registration URL” field will display both on the event’s detail page as well as its listing page card. If the “Ticket Cost” field is left blank, but a value is added to the “Registration URL” field, “Free Event” will display on the event’s detail page and listing page card.
Paid events
To indicate the cost or cost range of an event and provide a link for users to buy tickets, first, enter one of the following values in the “Ticket Cost” field:
- Any numerical value greater than 0 – i.e., $10 or $10-$30
- Any word other than “free”
- Any phrase that doesn’t include the word “free”
Now, enter a URL for purchasing tickets in the “Registration URL” field.
Following these steps will result in the value entered in the “Ticket Cost” field along with “Buy Tickets” hyperlinked to the URL you entered in the “Registration URL” field being displayed on both the event’s detail page and its listing page card.